| Site Homepage (Top) | Top of Murray's Writing Page | Top of Article |
Previous section: Approaches to Blogging Applications
Starting with iBlog
About iBlog
iBlog is a product of Lifli Software, a company in India. They have been developing and selling iBlog for months, but the product really got noticed when Apple started offering it for free (until November 25th) for subscribers of their .Mac online service. People who do not subscribe to .Mac can download a trial version (3 week expiration) and eventually buy a 2-seat license for $19.95 or a 5-seat license for $29.95.
The .Mac download is of iBlog version 1.3.1. It is a relatively solid product, although there is at least one bug which I will mention later. A newer version 1.3.2 is available in their download area. (If you are a .Mac subscriber, I would suggest first downloading the 1.3.1 version from your .Mac account and then upgrading to 1.3.2 so that your product is registered.)
For the remainder of the article I will discuss the function of the latter version 1.3.2 unless otherwise specified.
Starting Up iBlog
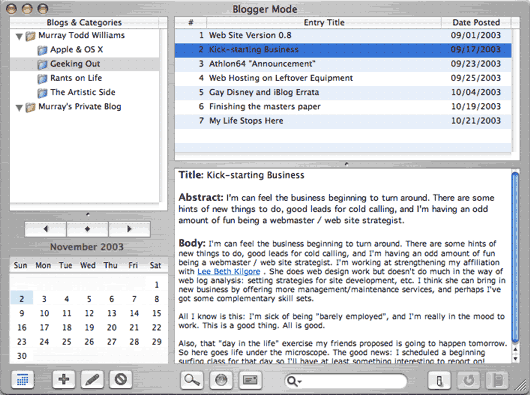
I was a little confused when I first started up iBlog. The program breaks your information into three conceptual categories: Blogs, Categories and Entries.
- Blogs.You must define at least one blog. A blog is a single, self-contained journal comprised of categories and entries. Each blog can be configured to be published to a different location. So for example, you could have your public blog published to your .Mac account, and a completely separate internal "company blog" published to an internal server (maybe even the built-in Apache server on your OS X workstation) for a local audience.
- Categories. A blog can have any number of categories. Every entry you make may be assigned to a single category. This allows you to break a single blog into natural threads, but it may prove confusing if you just want to start a simple web journal.
- Entries.The smallest atomic unit of your blog is an entry. Each entry may belong to one of the categories. Entries have a date stamp, a title, an abstract and a body.
I didn't understand that iBlog can be used without creating any categories, so I started by defining about six different categories that I thought my entries would fall under. I had one for items that would have to do with the Internet, another for other generally geeky stuff, one for "soapbox" rants on Life, the Universe & Everything, etc.
In the end I've boiled everything into four major categories: Apple & OS X, The Artistic Side, Geeking Out, and Rants on Life. It is trivial in iBlog to delete categories, create new ones, drag entries from one category to another, etc. so one should not hesitate to experiment. I'm not sure if I ultimately will use the category system. On one hand, people interested only in my Apple-oriented postings can quickly cut past the daily accounts of my life. On the other hand, this arrangement pretty much forces me to talk about things that fit one category or another. If part of my discussion is about my acting and then I wander over to an Apple related topic, I pretty much need to break it into two separate entries. This is easy to do, but I don't know how much it fits with my writing style.
HINT: For a category-free blog. If you choose not to use any categories, the default configuration will put an empty "Categories" section in your navigation bar. You can remove this section by the following steps:
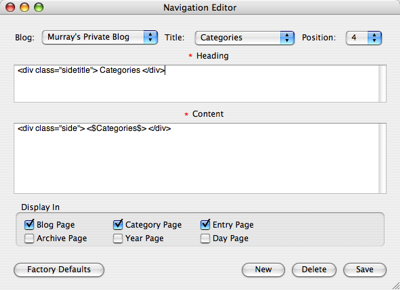
- Under the Blogs pulldown menu, select "Show Navigation Editor"
- Make sure you have the correct blog selected, then select "Categories" from the Title selector.
- Near the bottom of the page there are checkboxes indicating which pages will carry this section of the navigation bar. Deselect all these boxes to remove categories from your final site.
Remember that you will have to reverse this process if you decide to add categories down the road. You can also use this process if you would rather not give your audience the ability to navigate by date, RSS feeds, etc.
Getting started
The best way to get started with iBlog is to start writing entries. You might type in some fake entries, or perhaps it would suit you to actually start keeping a journal for a few days. As I mentioned before, it's easy to create, modify or delete categories. Hint: If you want to remove any category association to a blog entry, drag it from the category folder (eg. "Geeking Out" in the earlier image) to the blog folder. (eg. "Murray Todd Williams")
There are plenty of preferences you can play with to establish the desired look and feel of your blog. Some are found under "Preferences..." in the iBlog menu, others are found by right-clicking on the individual blog folders and selecting "Edit Blog". Note that the placement of configuration parameters under the "edit blog" option is a change in the newer version 1.3.2. These options used to be kept in the main Preferences window.
In order to preview your site, select "Preview" from the Blogs menu or click on the small magnifying glass icon. You will get the opportunity to preview your various selections. I suggest using this feature to make your initial "look and feel" decisions before you publish the blog to your web server. In version 1.3.1 I encountered some bugs that prevented configuration changes from propagating through already-published web pages. The newer version appears to have fixed this problem, but it's just quicker and easier to use the preview feature to establish your initial settings.
Once you're happy with your site, configure your web server's settings. (If you use your .Mac account then the configuration is made really easy.) Et voila! You can publish your site with a click of the button!
Next section: Customizing iBlog
Written material copyright © 2003 by Murray Todd Williams
Page last modified 11/02/2003 13:48